
class형 컴포넌트
함수형 컴포넌트와는 다른 방식으로 요즘에는 자주사용하지 않는 방식이나 알아둘 필요는 있다.
class형 컴포넌트로만 가능한 기능이 한두어개 있기 때문
import React from 'react';

function Hello({color,name, isSpecial}) {
    return (
        <div style={{
            color
        }}>
            {isSpecial ? <b>*</b> : null}
            {isSpecial && <b>*</b>}
            안녕하세요 {name}</div>
    );
}


Hello.defaultProps = {
    name: '이름없음'
};


export default Hello; //hello 컴포넌트를 만들어서 내보내겠다
color,이름을 받아와서 isSpecial값에 따라 앞에 *가 붙는 간단한 예제가 있다. 이 예제를 class형 컴포넌트로 바꾸어 보자.
class Hello extends Component {
	static defaultProps = {
        name : '이름없음'
    };    //default값을 넣는 다른방법


    render () {
        const {color , isSpecial, name} = this.props;

        return (
            <div style = {{
                color
            }}>
                {isSpecial && <b>*</b>}
                안녕하세요 {name}
            </div>
        )
    }
}
위 예제처럼 바꿀 수 있다.
아래와 같은 간단한 Counter예제가 있다. 코드를 또 class형 컴포넌트로 바꾸어보자.
function reducer(state,action) {
    switch (action.type) {
        case 'INCREMENT':
            return state +1;
        case 'DECREMENT':
            return state -1;
        default :
            throw new Error('Unhandled action')
    }

}

function Counter() {

    const [number, dispatch] = useReducer(reducer,0);

    const onIncrease = () =>{
        dispatch({
            type : 'INCREMENT'
        })
    }
    const onDecrease = () =>{
        dispatch({
            type : 'DECREMENT'
        })
    }

    return (
        <div>
            <h1>{number}</h1>
            <button onClick ={onIncrease}>+1</button>
            {/* onIncrease()로 쓰면 안된다*/}
            <button onClick ={onDecrease}>-1</button>
        </div>
    )
}
import react, {useReducer, Component} from "react";


class Counter extends Component {

    // constructor(props){
    //     super(props);
    //     this.handleIncrease = this.handleIncrease.bind(this);  //this와 연결해주는 가장 일반적인 방법 (첫번재 방법)
    //     this.handleDecrease = this.handleDecrease.bind(this);
    // }

    constructor(props){
        super(props);
        this.state = {   //state는 꼭 객체형태여아지만 작동한다. (배열이나 문자열은 안된다)
            counter : 0,
            fixed : 1
        };
    }


    // state = {    //세번째 방법
    //     counter : 0
    // }

    handleIncrease= () => {
        // this.setState({  //setState를 사용해야 한다.
        //     counter : this.state.counter +1
        // });   //함수형 업데이트와는 달리 반복사용해도 +1만 적용된다. 바뀌는 상태를 알려주는 기능이기 때문

        this.setState( state => ({
            counter : state.counter +1
        }));   //함수형 업데이트를 사용하면 해당코드를 반복사용하면 +1 * n개씩 카운터가 증가한다.
    }

    handleDecrease = () => {   //화살표 함수를 써도 this가 연결이 된다.
        this.setState({
            counter : this.state.counter -1
        });
    }


    render () { //Componet가 자체로 가진 메서드
        return (
            <div>
                <h1>{this.state.counter}</h1>
                <button onClick={this.handleIncrease}>+1</button>
                <button onClick={this.handleDecrease}>-1</button>
                <p>고정된 값 : {this.state.fixed}</p>   {/*setState안에서 설정한것만 바뀐다. (불변성 생각 x)*/}
                {/* handleIncrease가 실행되면서 handleIncrease함수내의 this는 연결이 끊긴다 */}
            </div>
        );
    }
}


export default Counter;
신경써야할 부분이 몇가지 있다.우선 render()안에서 handleIncrease등 함수를 실행하면서 handleIncrease함수 내의 this들이 연결이 끊기게 되는데 이를 해결하는 큰 3가지 방법이 있다.
1. constructor 활용
2. 화살표함수 호라용
3. state { } 로 직접 값 넣어주기
위 코드는 2번이 적용되어 있으며 1,3번은 주석처리로 각각 설명이 되어 있다.
추가적으로 알아둘 필요가 있는것은 setState에대한 이해이다. setState는 리액트에게 랜더링 요청을 하는 함수 이기에 바로바로 값이 바뀌지 않는다. 그래서 함수형으로 업데이트를 해주어야 바로바로 업데이트가 된다는 것 정도 알아두면 될 것 같다.
LifeCycle 메서드(생명주기 메서드)
class형 컴포넌트에서만 사용가능하다. useEffect와 약간 유사하다고 생각할 수 있다.
설명전에 아래 사진을 보자

출처 : https://projects.wojtekmaj.pl/react-lifecycle-methods-diagram/
생성될 경우
constructor
생성자
constructor(props) {
    super(props);
    console.log("constructor");
}
기존의 react 가 가진 props를 호출한 다음에 실행된다.
getDerivedStateFromProps
Props로 받아온 것을 State에 넣어야 할때 사용
static getDerivedStateFromProps(nextProps, prevState) {
    console.log("getDerivedStateFromProps");
    if (nextProps.color !== prevState.color) {
      return { color: nextProps.color };
    }
    return null;
  }
다음 Props과 현재 컴포넌트의 상태를 파라미터로 받아온 후에, 값을 비교해서 해당값을 반영할 수 있다.
render
class 컴포넌트에서 랜더링을 담당
render() {
    return <div>Hello World!</div>
}
자,render까지 실행되었다면 실행되는것이
componentDidMount
가 실행되게 되는 것이다.
componentDidMount() {
    console.log('컴포넌트가 화면에서 보여지고 있습니다');
}
외부 API호출, 특정 DOM에 이벤트 걸기 등이 가능하다. 브라우저에 표시가 되어서 DOM에 직접 접근이 가능한 것이다.
-----------------------------------------------------------------------------------------------------------------------------------
업데이트 될 경우
getDerivedStateFromProps
static getDerivedStateFromProps(nextProps, prevState) {
    console.log("getDerivedStateFromProps");
    if (nextProps.color !== prevState.color) {
      return { color: nextProps.color };
    }
    return null;
  }
shouldComponetUpdate
컴포넌트를 최적화 해야하는 단계에서 사용. 리랜더링이 불필요한 경우에 랜더링을 멈추게 하는 용도
shouldComponentUpdate(nextProps, nextState) {
    console.log("shouldComponentUpdate", nextProps, nextState);
    // 숫자의 마지막 자리가 4면 리렌더링하지 않습니다
    return nextState.number % 10 !== 4;
  }
따로구현하지 않으면 무조건 리렌더링을 하게 된다.
render()
getSnapshotBeforeUpdate
브라우저에 변화를 일으키기 직전에 호출
getSnapshotBeforeUpdate(prevProps, prevState) {
    console.log("getSnapshotBeforeUpdate");
    if (prevProps.color !== this.props.color) {
      return this.myRef.style.color;
    }
    return null;
  }
return하게 된다면 componetDidUpdate의 3번째 파라미터로 넘어가게 된다.
예를들어 아래와 같은 프로그램이 있다고 생각하자.

위 기능을 이용하여 스크롤이 추가되는 항목을 보지 않게끔 설정하는것이 가능하다.
componentDidUpdate
componentDidUpdate(prevProps, prevState, snapshot) {
    console.log("componentDidUpdate", prevProps, prevState);
    if (snapshot) {
      console.log("업데이트 되기 직전 색상: ", snapshot);
    }
  }
이전 Props정보와 이전의 상태를 가지고 함수가 실행되게 된다.
컴포넌트를 삭제할 경우
언마운트
componentWillUnmount() {
    console.log('컴포넌트가 사라지기 직전');
}
아래는 컴포넌트가 생성,업데이트,제거될때 과정을 알 수 있는 코드이다.
import React, { Component } from "react";

class LifeCycleSample extends Component {
  state = {
    number: 0,
    color: null
  };

  myRef = null; // ref 를 설정 할 부분

  constructor(props) {
    super(props);
    console.log("constructor");
  }

  static getDerivedStateFromProps(nextProps, prevState) {
    console.log("getDerivedStateFromProps");
    if (nextProps.color !== prevState.color) {
      return { color: nextProps.color };
    }
    return null;
  }

  componentDidMount() {
    console.log("componentDidMount");
  }

  shouldComponentUpdate(nextProps, nextState) {
    console.log("shouldComponentUpdate", nextProps, nextState);
    // 숫자의 마지막 자리가 4면 리렌더링하지 않습니다
    return nextState.number % 10 !== 4;
  }

  componentWillUnmount() {
    console.log("componentWillUnmount");
  }

  handleClick = () => {
    this.setState({
      number: this.state.number + 1
    });
  };

  getSnapshotBeforeUpdate(prevProps, prevState) {
    console.log("getSnapshotBeforeUpdate");
    if (prevProps.color !== this.props.color) {
      return this.myRef.style.color;
    }
    return null;
  }

  componentDidUpdate(prevProps, prevState, snapshot) {
    console.log("componentDidUpdate", prevProps, prevState);
    if (snapshot) {
      console.log("업데이트 되기 직전 색상: ", snapshot);
    }
  }

  render() {
    console.log("render");

    const style = {
      color: this.props.color
    };

    return (
      <div>
        <h1 style={style} ref={ref => (this.myRef = ref)}>
          {this.state.number}
        </h1>
        <p>color: {this.state.color}</p>
        <button onClick={this.handleClick}>더하기</button>
      </div>
    );
  }
}

export default LifeCycleSample;
처음 만들어 졌을때 위에서 설명한 순서대로 컴포넌트 구성이 시작되는 것을 알 수 있다.
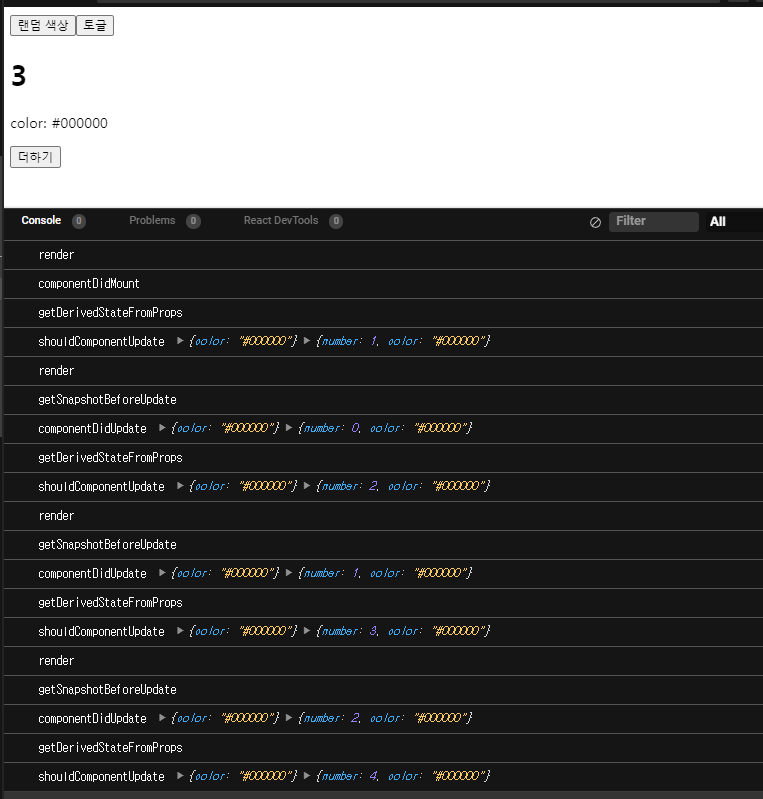
더하기를 누를 때마다 렌더링이 되면서 위에서 말한순서로 업데이트가 진행이되고, number가 4로 끝날때 렌더링을 하지 않은 규칙을 넣었기 때문에 렌더링 직전에 getSnapshotBeforeUpdate 함수에서 멈춰지는것을 알 수 있다.
componentDidCatch
에러를 처리할 수 있는 메서드. class형 컴포넌트에서만 구현할 수 있는 기능이다.
$ npx create-react-app error-catchgit bash에서 해당프로젝트를 만들공간으로 만든 후에, 다음과 같은 프로젝트를 새로 만들고 실행하자.
그리고 User.js파일을 src폴더 안에 추가해서 아래 코들르 작성해보자.
//User.js
import React from 'react';

function User({user}) {

    if (!user) return null; //에러방지 코드


    return(
        <div>
            <div>
                <b>ID</b> : {user.id}
            </div>
            <div>
                <b>Username</b>: {user.username}
            </div>
        </div>
    );
}


export default User;
만약 아래와 같이 App.js가 이루어져 있다면, asdfsadf가 화면에 표시되지만 위 코드에서 에러방지 코드를 넣지않으면 에러가 발생해서 아무것도 없는 흰 화면이 출력되게 된다.
//App.js
import './App.css';
import User from './User'

function App() {

  return (
    <div>
      <User />
      <b>asdfsadf</b>
    </div>
  )
}

export default App;
이때 흰화면이 아니라 Error발생된걸 잡아내기 위해 아래와같은 class형 컴포넌트를 새로 만들어 준다.
//ErrorBoundary.js
import React, {Component} from 'react';

class ErrorBoundary extends Component {
    state = {
        error : false
    };

    componentDidCatch(error,info) {    //에러가 발생되었을때 실행
        //에러정보, 에러가 발생곳의 정보
        console.log('에러가 발생했습니다.')
        console.log({
            error,
            info
        });
        this.setState({
            error : true
        })
    }

    render() {
        if ( this.state.error) {
            return <h1>에러 발생!</h1>
        }
        return this.props.children;
    }
}


export default ErrorBoundary;
그 이후,
function App() {

  return (
    <ErrorBoundary>
      <User />
    </ErrorBoundary>
  );
}
App.js에서 ErrorBoundary를 감싸주고 아까 만들어둔 에러방지 코드를 주석처리해주면

다음과 같이 에러발생을 화면상으로 볼 수 있게 된다.
에러를 실시간으로 모니터링하기 위해 Sentry를 연동하면 굉장히 쉽고 좋다.
Sentry
Application Monitoring and Error Tracking Software
Self-hosted and cloud-based application monitoring that helps software teams see clearer, solve quicker, & learn continuously.
sentry.io

로그인 한 후에 리액트를 누르고 create 프로젝트를 누르면 된다.
그 이후 메뉴얼대로 작성하면 된다.
npm install --save @sentry/react-native
# or
yarn add @sentry/react-native
'FrontEnd > JavaScript' 카테고리의 다른 글
| 28_타입스크립트 보다 자세한 문법 (0) | 2022.01.08 |
|---|---|
| 24_타입스크립트 문법 (0) | 2022.01.06 |
| 08_HTML과 JS연동하기 (0) | 2021.12.20 |
| 07_유용한 JS지식 (0) | 2021.12.19 |
| 06_JS_배열 내장함수 (0) | 2021.12.18 |